What You Make of It – Vintage Style Napkin Rings – With Abigail of Gloaming Designs
Please help me in welcoming Abigail of Gloaming Designs to Vintage Indie. She is sharing her Vintage Style Napkin Rings for this week’s DIY project. I think these are simply gorgeous and would be beautiful on your Thanksgiving table this year.
These
napkin rings are made from jute chair webbing, a very inexpensive and
possibly even (if you find an old chair) up-cycled material. but cool
– it is very cool! one of those functional but fascinating materials.
this particular webbing is from the popular upholstery company Waverly
via Joann’s Fabrics, but i’d venture to say that any fabric store that
carries home decor fabrics will have a roll.
Supplies
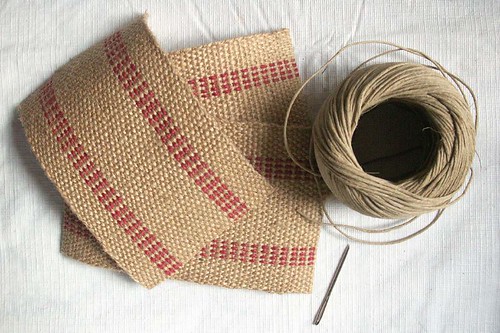
-3
3/4" wide Jute Chair Webbing: enough yardage for the number of rings
you want, each ring needing approx. 6 1/2 inches of length.
-20 lb. Hemp Cord: approx. 6 inches per ring
-1 large sewing needle: very thick with a large eye for the hemp cord to pass through
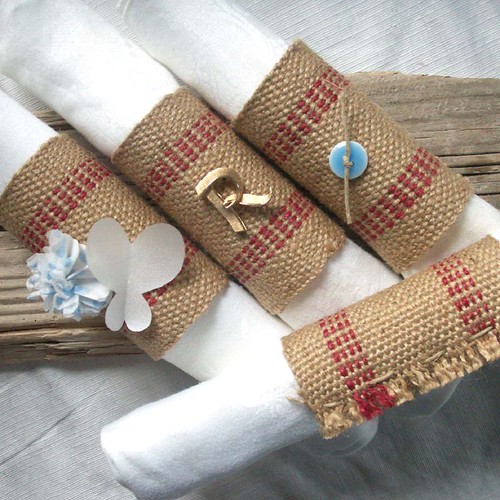
-optional: decorative elements (see end of tutorial and above photo for suggestions)
Step 1: Cut lengths of 6 1/2" from the webbing, one
length for each finished ring you want. (Alternately, wrap the webbing
around the folded napkins you intend to use, add about 1 1/2" for ease
and sewing, and cut there.) This does not have to be an exact
science. I usually measure the first and use it to hold against the
webbing to cut more. Once they are cut, use your needle to pick out
the first three or so rows of the weave. This is to make a fringe edge
for the ring. Once you’ve pulled out enough of the rows that the
fringe is a length you like, trim the hanging jute near the webbing’s
edge. I suggest not pulling out too much jute, though, as this will
ultimately reduce the size of the finished ring.
Step 2:
Once you have your fringe edge, make a tube out of the webbing by
overlapping the two cut edges with your fringed edge on top. Overlap
about 1 1/4" (including fringe) and pin to hold in place. Using the
hemp cord, thread the needle. Begin to sew a few rows of jute in from
the fringe (so the stitched won’t fray out of place) with long running
stitches beginning with your needle pushing through from the inside of
the tube to the outside and ending with the needle pushing from the
outside to the inside. Both ends of the cord will be hanging from the
inside of the tube. *Do not cut a piece of cord from the hemp roll,
thread the needle directly from it. This way, you are sure to have
enough cord for sewing and not much is wasted. Do not make a knot in
the cord, simply pull the stitches through leaving long tails of cord
on both ends.*
Step 3: Once you’ve stitched the two
sides together, hold both ends of the cord and gently tug to remove any
slack from the stitches. Form a knot in the cord, snugging it up to
the inside of the napkin ring (both ends of the cord should be hanging
from the inside of the tube, to hide your knots). Trim any excess cord.
Step 4: Using your thumbs, fluff the fringe to
separate the fibers a bit giving the edge a softer look. You can do
this as much or as little as you like.
Step 5: Inspect
your work to make sure the stitches are secure and the fringe is fluffy
enough! At this point you can add embellishments. I like to use this
with the fringe edge up but you can also attach decoration to the other
side of the ring. Consider making your decoration removable – maybe
specific to your event. With a small piece of cord you can tie on one
or more buttons with a simple knot or a bow. I love the idea of
collecting inexpensive letter pins and ‘monogramming’ the rings for
your guests (the pins can be removed for your next gathering). Tissue
paper flowers can get the kids involved and can be attached with a bit
of floral wire pushed through the webbing and twist tied. What are
your ideas?
Step 6: Insert an napkin and enjoy!
These are so cute, and PERFECT for a fall party! I’ll be linking to these!